For most woodworkers, both amateurs and professionals, making a straight cut with a hand saw is very tasking. When you’re cutting with a hand saw, there are so many things that can go wrong; you could end up with a diagonal cut or a curved cut. You may ruin your wood or even injure yourself if you’re not careful.
To make a straight cut with a hand saw, you must take the correct measurements, use the right equipment and employ the correct techniques. You can’t just see through and hope for the best results. So, if you want to understand how to make a straight cut with a hand saw, use the techniques below. These will help you make the most of your woodworking experience.
- Put On Safety Equipment
- Use a Flat, Secure workbench
- Use the Correct Saw
- Secure The Wood To The Workbench Or Table
- Draw A Cutline On The Wood
- Secure A Straight Board Unto The Wood
- Place The Blade On The Line At A 45° Angle
- Make A Few Upward Strokes With The Hand Saw
- Move The Saw Forward And Backward To Cut The Wood
- Make Your Stokes Shorter As You Finish Cutting
- Use a Miter Box Where Appropriate
- You Can Use a Magnetic Dovetail Saw Guide
This guide lists and explains the complete process of making a straight cut using a hand saw. This includes the preliminary stages of finalizing the activity.
12 Steps To Making A Straight Cut With A Hand Saw
Usually, straight cuts are an essential element when you’re carrying out any woodworking project. Well, this exact design is achievable using several different kinds of saws. Notably, you can create a straight cut with a hand saw.
Still, there is a standard way of creating straight cuts with a hand saw. Now, that is what this guide outlines.
1. Put On Safety Equipment
The first thing you need to do before you get started is to ensure your safety. Woodworking can be a little tricky, especially if you’re a beginner. And for most beginners, cutting a straight line can be one of the most challenging aspects of woodworking.
The first thing you need to watch out for is safety; safety is critical. With a hand saw, you won’t need much safety equipment. But, you can get some hand gloves and goggles to prevent the dust from the wood from getting into your eyes. Also, don’t wear long-flowing sleeves when you’re in the workshop.
2. Use A Flat, Secure Workbench
To get started, find yourself a tough, flat work surface. First, all the legs of the surface have to be level and secure on the ground so that it doesn’t start moving or shaking when you’re working. Next, you can get a workbench or a table to clamp the wood.
If you get an unstable work surface and one that isn’t very straight, if it begins to shake when you’re working, you may not be able to get that straight cut. You can shake the table or workbench a bit to ensure the legs are level and the top of the table is even. Also, make sure the table is not wobbly.
3. Use The Correct Saw
Cutting saws are not the same. And if you’re doing any cutting, you need to use the right saw for that particular cut to get something desirable. Using the right size saw makes a lot of difference in the quality of your cut.
There is a different saw for cuts across the grain, also known as rip cuts, and the saw for cross cuts is also different. Furthermore, other saws are good for both cross-cuts and ripped cuts; they’re known as universal saws.
So you can use the saws as they apply to the cut you want to make.
Also, there are western Japanese saws and eastern Japanese saws. A western Japanese saw takes more force and cuts on pushing them, while an Eastern saw cuts on the pull. It is also slimmer and has smaller teeth.
The saw you decide to use a matter of choice and which one works best for you. Always choose a saw you feel comfortable holding in size and weight. You don’t want something that will be too heavy for you to hold.
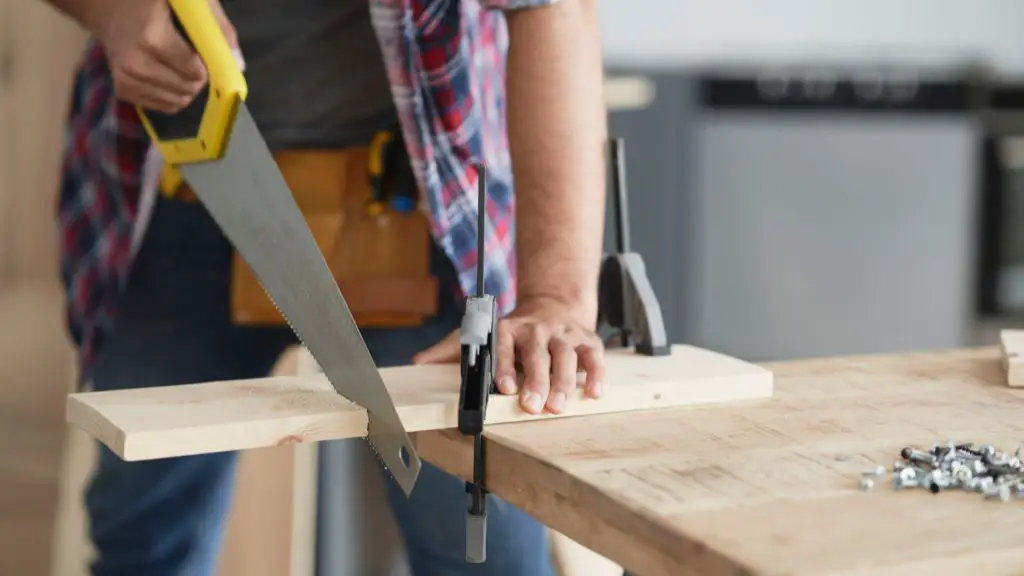
4. Secure The Wood To The Workbench Or Table
Next, you must place the wood on the workbench and secure it. Clamping the wood on the table is essential so that the wood doesn’t keep hurrying back and forth while you’re cutting. You can use some clamps to keep your wood securely on the work table.
Not only do any movements of the wood disrupt your rhythm and ruin the straight cut, but it may also cause you injury. Don’t use too many clamps, but use as many as you need to hold the wood firmly on the table.
Additionally, allow a good portion of the wood to hang off the worktable while clamping it. Let it hang over the edge where you want to cut. That is to ensure you have enough room for your blade when you begin to cut.
However, if you allow too much of it to hang off, the wood will not be balanced, making your cutting difficult.
So leave the correct size off the work surface.
5. Draw A Cutline On The Wood
You’ve secured your wood to the workbench with clamps. Next, you can use a yardstick, a ruler, or a triangle. Get a pencil and a straightedge to draw a line on the wood showing where you want to cut.
If you don’t have a ruler, you can use any other straight-edged measurement tool on hand and use it to draw out a straight line on the part of the wood you intend to cut.
You can use any other writing tool on hand if you don’t have a pencil. However, with the line already drawn, you will make your cut more confidently, especially when you know that your line is already straight.
Make sure the writing tool you use is very bold so that when you’re cutting, you’ll be able to follow it accurately. You can use the flat side of your hand saw to get a straight line. Just be careful so that the saw doesn’t injure you.
6. Secure A Straight Board Unto The Wood
Next, get a light wooden board. Get a board you’ve already discarded and one with at least one straight edge. Once you find the board, place it on the wood you’re working on and secure it with clamps.
While clamping, the straight edge has to be in perfect alignment with the line you just made on the wood, and this is also known as a jig. The board is essential to keep your hand saw in place while making the straight cut.
That’s also why the board has to be a discarded one you’re not using anymore, as it will likely be damaged while cutting.
7. Place The Blade On The Line At A 45° Angle
Once you’ve prepared everything and secured everything, you can begin cutting. But, first, take your hand saw of choice (it must be sharp) and hold the saw in your dominant hand (always use it for such tasks).
Hold the saw firmly, and your index finger should rest on the side of the saw to better control the hand saw. Next, align your shoulder, elbow, and wrist with the blade. Use your free hand to steady yourself and keep it away from the saw.
Also, the jig on the wood has to be against the side of the saw, and the blade of the saw has to be placed at a relative angle to the horizontal surface of the wood.
The 45° angle is often more convenient and makes for a better cut, but it is not a hard and fast rule. The type of saw you have and the kind of cut you want will also determine the angle you cut.
Also, you have to ensure your safety when you’re cutting. If you’re making a cross-cut, you’d be better off with a 60° angle cut. But for the more common cross-cuts, use a 45° blade angle.
8. Make A Few Upward Strokes With The Hand Saw
After you place the blade of the handsaw at the appropriate angle, make a few firm strokes on the edge of the wood.
Pay attention to the marked line and place the strokes precisely on the line. You can make two or three strokes, but three is always better. If the wood begins to splinter at this stage, you will need to adjust the set-up of the wood, board, and saw accordingly.
It would be best if you also worked on the splinters before you continued cutting. However, if there are no splinters and everything is in place, you can begin cutting. Maintain the angle and use the entire length of the saws blade
9. Move The Saw Forward And Backward To Cut The Wood
After you’ve made the first three strokes, if you are cutting along the line and there are no splinters in the wood, you can begin cutting in earnest. Move the saw back and forth to cut along the line to cut.
Keep moving your hand forward and backward in full strokes. Make sure you are cutting along the line. If you are cutting across the grain or cross-cutting, cut the wood at a 45° angle.
Accidents may not be prevalent, but they happen to amateurs and even professional woodworkers. However, if you’re cutting with the grain or making a rip cut, you can hold the saw at a 60° angle. Just ensure that you hold the saw carefully and away from your body.
10. Make Your Stokes Shorter As You Finish Cutting
While working through the main length of your workpiece, keep sawing using a proper sawing motion. Ensure the saw blade is aligned with the board you mounted on the wood earlier.
Check often to make sure that the cut is still straight. Then, if you realize that you’ve diverted from the straight line and your cut isn’t on track, you can reassess and correct the anomaly.
As you reach the end of the line, the line you’ve drawn on the wood is cut in shorter strokes. So make your strokes shorter by half. That way, your wood will not splinter or crack as you near the end of cutting.
11. Use a Miter Box Where Appropriate
Most woodworkers are familiar with miter boxes. A miter box is made of a box with many slits angled differently and a handsaw. Place the saw between the slits and use to box to make straight cuts. If you have a miter box, you can clamp the wood to the miter box before you begin cutting.
You can purchase a miter box at a hardware store near you or an online seller. And if you want to cut your wood at an angle, you can. Also, the slits on the miter box will be angled.
Also, with a miter box, you can speed up the cutting process, and rest assured that your cuts will almost always come out straight. With the slotted unit, you can brace your saw blade in an already set orientation as you cut. There is little margin for error, and it’s less time-consuming.
If you have many straight cuts over time, you should invest in a miter saw. With it, you can perform straight cuts and also perform miters. And you wouldn’t even need a power saw.
12. You Can Use a Magnetic Dovetail Saw Guide
Instead of free-hand cutting, you can use a guide that uses rare earth magnets to hold your saw in place. The magnet does not just act as a guide; the magnets hold your hand saw in place so your cut doesn’t deviate from the cutting line.
Magnets are more expensive, and if you don’t do much cutting, you won’t need to purchase one. But, if you do a lot of straight cuts, you can get one. They’re much better than using a piece of wood to guide cutting. The surface cut they give off is better than free-hand cutting, and if you use a magnet, you get a fine finish and a clean cut.
Conclusion
Like everything else, you can get better at making straight cuts with time and practice. But to get it right, you must have a suitable workspace, tools, and equipment. When cutting, you need to take it slow and easy. Also, remember to put on safety equipment so you don’t injure yourself with the handsaw or other tools.
Well, I hope you found this guide very helpful and that you’ve achieved your goal. Remember that meticulously following these steps will lead to the best results.

I have always loved sawing and cutting. I started doing it when I was a kid and never stopped. I love the feel of the wood beneath my hands, the smell of the sawdust, and the satisfaction of creating something beautiful.
I’ve been writing for quite some time now and thoroughly enjoy sharing my passion with others. I’ve written for both online and offline publications – such as Amazon and Medium.